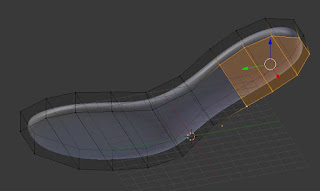
The first thing to do here is to raise the heel. This isn't as simple as editing the edges and lifting them up along the Z axis (blue arrow). Doing that would end up effectively stretching the length of the shoe. Instead the insole shape needs to be bent upwards. To do this I first need to create a "Curve": Add->Curve->Bezier
After adding the curve get into edit mode and drag the ends of the curve until they reach the toe and heel of the foot. Next angle the view so you can see more of a profile of the insole object and drag the heel end of the curve up using the blue translation arrow. The "curve" handles can also be dragged to change the shape of the curve. Additional points can be added in the middle of the curve by selecting two points and using the "Subdivide" command: Curve->Segments->Subdivide
Once the curve looks good get out of "Edit Mode" and select the insole shape again. Add a "Curve" modifier and select the curve object you just created. Depending on how things are oriented this may cause some weird results. Blender sometimes has some oddness to it that just needs to be worked around. Rotate and move the insole object until it appropriately takes the shape of the curve. You might need to change the "Axis" that the curve modifier is using. For the image below I needed to set the axis to "-Y" and rotate the insole object 180 degrees around the Z axis.
Now select the insole object and add a "Solidify" modifier, adjust the thickness to about 2cm, and apply it. The result will be the base shape of the shoe.
Enter "Edit Mode" again and angle the view until the bottom of the shape is visible. Holding down the shift key, right-click each point surrounding the area where a heel should be coming out. This should select a portion of the shape's surface.
Extrude this section (Mesh->Extrude->Region) and hit escape (instead of dragging the extruded surface). Take care not to de-select the selected region and add a "Scale" transform (Mesh->Transform->Scale) and hit "Enter" to apply it. Note that the resulting scale transform parameters will appear in the toolbar to the left.
By setting the "Z" parameter to 0 and leaving the "X" and "Y" parameters at 1 the selected section will effectively be flattened. Now drag this section down until it is even with the bottom of the toe of the shape. Alternatively in the "Transform" section of the toolbar to the right the "Z" value of the "Median" section can be set to 0.
So now I have this kind of blobby looking heel. The next thing I want to do is flatten out the bottom of the heel and to do this I want to go over a couple of techniques.
Selecting multiple points can be more easily achieved by holding down the CTRL key and tracing a line around the points you want selected. Select the bottom of the heel using this technique.
As you can see the "Subdivision Surface" modifier is making this more rounded. I want it to be more flat, but I don't want to get rid of the modifier. The way to do this in Blender is to add another set of points very close to these ones effectively defining a micro curve. An easy way to accomplish this is to simply "Extrude" this surface here (Mesh->Extrude->Region) or just press "E" if you don't want to navigate through the menus. Be sure to hit the escape key to keep the extrusion from being dragged. Note how much flatter the bottom of the heel is now:
There are also different ways to select the faces you want to flatten. The three buttons pictured below allow you to select by point (Vertice), line (Edge), and surface (Face). Try toggling these three modes and see how they affect selecting.
Keep in mind after flattening a surface like this there will be duplicate points surrounding the flattened area. This means in order to drag any of these points their doubles will likely also need to be selected.
One last tool I want to demonstrate is "Remove Doubles". If you ever want to un-flatten something you can use this tool to combine back together any selected points that are "touching". This tool can be found on the left toolbar. Go ahead and try this out by selecting the bottom of the heel with a CTRL-drag select. You can re-extrude the heel to flatten it again or just hit "CTRL-Z".
Use these techniques to give the shoe a little more definition. Feel free to add extra structure using the "Knife" tool (learn about this tool here). The "Knife" tool can cut additional surface detail to be either extruded or flattened. I will be adding some handles to my shoe using "Extrude" around some of the edges for straps. This will make the shoe wearable after printing. I will be using the "Knife" tool down the top center of the shoe to better define an arch and make rests for the heel and ball of the foot. Finally I am going to also drag the toe of the shoe out a bit to bring it to a point.
The end result of my shoe looks like this:
Keep in mind before printing that this shoe was designed with little to no wiggle room for my foot. Be sure to scale the entire shoe up just a tad for comfort. Once I get this printed I will get another post up about what you need to know to get a good print.
The finished shoe can be found and downloaded from Thingiverse at: http://www.thingiverse.com/thing:1587947


No comments:
Post a Comment