First I must digitize and measure a footprint. There are scanners out there you can acquire that are made specifically for scanning feet, but you can actually accomplish this simply by putting your footprint or tracing it onto a piece of paper and taking a picture with it on your phone.

Note that I traced my contact footprint and overhanging footprint. I'll use that later.
At this point you will want a graphic editor to trim this image with. PaintDotNet is a free editor that I use. I will next cut this down to just the size of the paper. I'll use my knowledge of the measurements of this paper to properly scale this outline. I know that the paper is 8.5" x 11" which will tell me the correct size of the foot I am designing to.

I will now get the footprint into a 3D format. For this you will want a 3D modeler. I'll be using Blender. First open a new, empty scene.

Next add a new "Empty" object. Add->Empty->Image:

Now go to the configuration for the Image object and load the footprint picture. Make sure to set the X and Y offsets to -0.5 to center it.
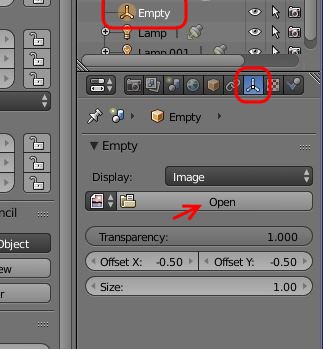
Keep in mind that Blender deals with generic coordinates and sizes. It's up to you to decide what those numbers mean. So note that the size of this image is currently set to "1.00". This means if I assume everything is in centimeters (which I am) then the length of the image is currently 1cm. Because I know the paper this tracing is on is 11 inches I want to set this length to 11 inches which would be 27.94cm.

Now that I have a to-scale outline of the foot I am designing for I can start to make a virtual foot to design around. To do this I am going to add a new "Plane" to the project:

While in "Translation" mode use the Red and Green arrows to drag the new plane to the bottom of the heel.

Now get into "Edit Mode" and deselect all points: Select->(De)select All

Now right-click on the upper-left corner of the plane to select it and use the red arrow to drag it left to match the edge of the outline of the foot.

Repeat the last step on each corner until you have just covered the back of the heel.

Holding shift, select the top two corners. Next, extrude another segment: Mesh->Extrude->Edges Only

Doing this will leave you in a "move" mode where the new segment will move around with your mouse. Just hit the "Escape" key to cancel this movement. Instead use the green arrow to drag the segment a distance upward.

Now, just like before, move each corner until it covers the outline. Continue extruding until you have a very rough, boxy version of your outline. You want this to roughly resemble the bottom of a shoe because this will become the shape of your insole. Feel free to give it a little space around the edges for comfort and shape.


At this point hide the paper drawing and get out of edit mode.

I want to keep things very low resolution like this so it is easier to work with. Using "Modifiers" in Blender will allow me to add a "smoothing" effect without actually applying it yet. This will allow me to bounce in and out of edit mode to make adjustments at the lower resolution, but still see the higher resolution object as I work with it.
The first modifier I am going to add is a "Subdivision" modifier. This will add many "in-between" points to my insole and smooth them out. To do so select the "Modifiers" toolbar and add a "Subdivision Surface" modifier. (Make sure to have your "Plane" object selected before adding this modifier).

Set the "View" and "Render" values to 4. The higher this number the more points will be inserted. 4 should be enough for good print quality. Observe now that the insole is much more smooth.

I now have a base shape and size from which I can build customized designs to fit my foot. I will use this base in future posts as I move toward making a complete shoe ready for 3D printing.
For this post I will simply demonstrate how to turn this into a printable insole. Go ahead and add a "Solidify" modifier. Change the angle at which you are looking at your insole by holding down your middle mouse button and dragging your mouse in the view area. Adjust the "Thickness" setting on the Solidify modifier to 1 and the offset to 1. You should now see a centimeter of thickness has been added to your shape. If you were to export this to an STL file you would be able to print it with a rubber material and put it in your shoe for extra comfort.

This is about the ugliest insole you'll ever see but it is a pretty good start especially if you are completely new to 3D modeling. In my next post I will move directly into turning this into a base for a wedge shoe.
No comments:
Post a Comment